A new 4 burner propane gas grill shows up with a spec sheet, a bag of bolts, and a set of promises. Forty thousand BTU here, a broil zone there, cast iron grates, a griddle pan, side shelves that fold down. None of that tells you the one thing that decides whether your first cook is good: where the hot spot is.
Every gas grill has one. It is the corner of the grate that runs hotter than the rest, and on most four-burner carts it lives at the back right, right above the crossover between burners three and four. On a fresh unit you find it by accident, when the burgers on one end are charred and the burgers on the other end are still pink in the middle. That accident costs you a cookout. Finding it on purpose costs you 40 minutes on the day you assemble the grill.
I spent 15 years on the line and 12 more judging a BBQ circuit, and I keep a spiral notebook with every cook logged: ambient temp, wind, lid position, and which corner of the grate ran hot. The routine below is the one I run on any 4 burner propane gas grill before anything expensive touches the metal. Assembly check, burn-in, grate seasoning, a bread map of the hot spots, then a first cook you can actually learn from.
Two grills sit at the center of this because they represent the two ways people buy a four-burner right now, and they are the two I get asked about most.
Why you should trust me
I do not score a grill I have not cooked on at least three times, and I will say that plainly up front: I have not put three cooks on either of the units below. What I am handing you is the setup procedure, not a verdict, and the procedure works on any four-burner propane grill regardless of the badge on the lid.
What I do bring is a routine. A dozen burgers for evenness, a full brisket for heat stability, a chicken for flare-ups. Every grill on my bench gets the same treatment and the same notebook page. I own four grills, more thermometers than any reasonable person needs, and a rebuilt kettle in the driveway that taught me more about airflow than any showroom ever did. I do not review pellet smokers here, because that is a different bench and a different set of physics. Gas is a utility, and utilities should be set up properly.
How I picked and how I tested
The two grills below were not picked as a ranking. They were picked because they sit at the two ends of the four-burner propane market as it stands now: the portable, budget, griddle-included route and the stainless, broil-zone, fast-assembly route. If you are shopping a 4 burner propane gas grill, you are almost certainly deciding between those two philosophies.
What I look at before anything else, in order: burner layout and shape, because layout predicts hot spots; grate material and mass, because mass predicts recovery time; igniter design, because a bad igniter ends the grill's useful life in season one; shelf size, because a side table smaller than a plate is decoration, not furniture; and the warranty as written, not as advertised.
My test method is the same every time. A bread map for hot spots. A dozen burgers for evenness. A long cook for heat stability and recovery. I have not completed that sequence on these two units, so treat the notes below as specifications plus the caveats I would check first, not as measured results.
The two grills on the bench
One is a portable 40,000 BTU four-burner cart with a cast iron grate and a griddle pan in the box. The other is a stainless four-burner with a broil zone, foldable shelves, and a fast-assembly claim. Both are four burner propane grills. They solve different problems, and the setup routine in the next section applies to both.
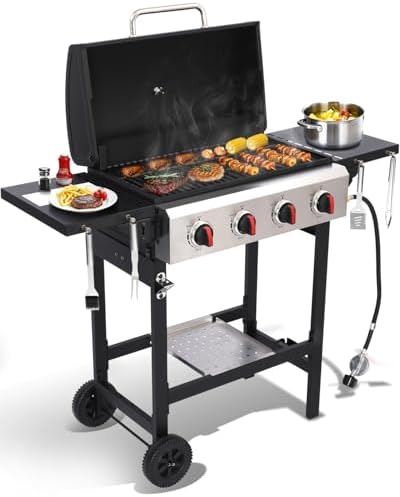
Budget pick: 4 Burner Propane Gas Grill, Portable BBQ Grill with Cast Iron Grate & Griddle Pan, Folding Side Table for Camping Backyard, 40000 BTU Easy-Clean Outdoor Cooking
 Visit on Amazon →
The reason this one is interesting has less to do with the four burners and more to do with the griddle pan. A griddle that drops over part of the grate turns a section of your cooking surface into a flat top, and a flat top is the most underrated tool in outdoor cooking. Smash burgers, breakfast, peppers and onions, fried rice. If you have ever watched a diner line cook work a flat top, you know why.
The cast iron grate is the other selling point. Cast iron holds heat and gives you a heavier sear mark than thin stainless rods, and it does not care about rust the way people fear, as long as you season it and keep it dry. The flip side is weight and warm-up time, plus the maintenance ritual: brush it hot, oil it thin, never leave it out in the rain.
The folding side table and the portable cart frame tell you what this grill is for. It is a tailgate, campsite, and small-backyard machine. Portable frames mean thinner steel than a stationary cart, and thinner steel means less thermal mass. Expect recovery time to be the weak spot once you open the lid with four burners running. Check the burner warranty terms before you commit, because that document matters more than the BTU number on the box.
Flaws but not dealbreakers: Portable carts wobble on uneven ground, and folding shelves are usually smaller than they look in photos. Measure before you plan a full brisket cook on it.
Anyone who wants one grill that travels, stores small, and can run a griddle for breakfast will get the most out of this one.
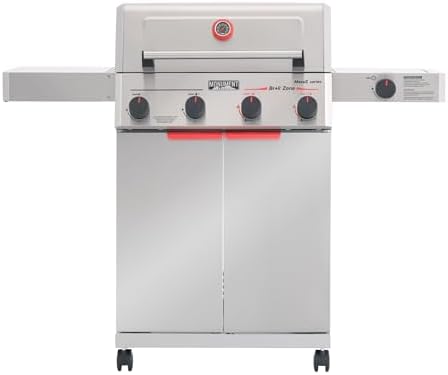
Our pick: Monument Grills 4 Burner Propane Gas Grill with Advanced Broil Zone, Stainless Steel Outdoor Mesa 2 Barbecue Grill, Foldable Side Shelves, 500°F in 5 Mins, Fast Assembly, Mesa II 410FBZ
 Visit on Amazon →
The headline feature here is the broil zone, which is the manufacturer's name for the area that is supposed to get hot enough to crust a steak. That is the sear zone, and it is the single most useful thing a four-burner cart can offer, because it means you can hold two zones at once: a hot side for the crust and a cooler side to finish the meat without burning it.
The 500°F in 5 minutes claim is a preheat number, and preheat is the least honest spec on any grill. The spec that actually matters is recovery time, meaning how fast the temperature climbs back after you open the lid to flip. A grill that hits 500 fast and then sags for five minutes is worse than a grill that takes longer to get there and snaps back. You will only learn that on cook two, which is why the workflow below ends with a logbook.
Stainless steel construction and foldable side shelves make this the stationary-cart option. Stainless is easier to wipe down than painted steel, it does not flake, and it shows every fingerprint. Fast assembly means fewer bolts and less swearing, but check the gas connections yourself regardless of how quickly the cart goes together. And read the warranty language on the burners and the firebox, because that is where the real value of a stainless cart lives.
Flaws but not dealbreakers: Stainless grades vary and the spec sheet rarely tells you which one you got. Also, a broil zone is only useful if you actually cook with two zones. If you grill everything on high across all four burners, you paid for a feature you are not using.
Anyone who cooks for a household, wants zone cooking, and keeps the grill in one spot on a patio should look here first.
The actual setup and hot spot mapping workflow
This works on either grill above and on any four-burner propane cart. Do it once, write it down, and you will never guess at your grill again.
Step one: Assemble and leak test. Build the cart on a flat surface, not on grass. Once the tank is connected, mix dish soap and water, brush it on every connection, and open the tank valve. Bubbles mean a leak. Tighten, retest, and do not light anything until the bubbles stop. This is the step people skip and the step that matters most.
Step two: Position the grill. Ten feet from siding, out from under eaves, and if you can, out of the prevailing wind. Wind is the enemy of temperature stability, and it is the reason two identical grills cook differently in two backyards. If your patio is a wind tunnel, plan on a wind screen.
Step three: Burn-in. Every burner on high, lid closed, 20 to 30 minutes, nothing on the grates. This burns off manufacturing oils and lets the metal expand into its working shape. It will smell bad. That is normal.
Step four: Season the grates. Let the grates cool to warm, brush them, then wipe a thin coat of high smoke point oil across the bars with tongs and a folded paper towel. Close the lid, run the burners on medium for 10 minutes, repeat twice. Cast iron takes this better than stainless, but both benefit.
Step five: The bread map. This is the whole trick. Set all four burners to medium, close the lid for 10 minutes, then lay a single layer of cheap white bread across the entire grate, edge to edge. Watch it. The slices that blacken first mark your hot spots. The slices that barely toast mark your cool zones. It takes one loaf and five minutes, and it is more useful than any temperature chart.
Step six: Draw the grate. Sketch a rectangle on paper, divide it into four burner sections, and mark what the bread told you. Note the hot corner and the cool corner. On most four-burner carts you now have a sear zone, a medium zone, and a holding zone, and you can create a fourth by turning off the far burner and running the others.
Step seven: Learn recovery. Heat to medium, open the lid, leave it open for 60 seconds, close it, and time how long until the thermometer reads the same number again. Write that number down. That is the most honest specification your grill has, and it dictates how you cook on it.
Step eight: First cook, cheap food only. Chicken thighs, not a brisket. Thighs are fatty, forgiving, and they tell you everything about flare-ups, because dripping fat is what finds the weak spots in any grate design. A dozen burgers works too. Watch which patties finish first and compare that to your bread map. If they match, you read the grill correctly.
Step nine: Log it. Ambient temperature, wind, which burners were on, recovery time, where the flare-ups happened. Three cooks in, that notebook is worth more than any review you will read, including mine.
What to do on cook two and three
Cook two is the evenness test. Space a dozen burgers across the grate in a grid, same thickness, same start time, and pull each one when it is done. If the ones over your marked hot zone finish two minutes early, your map is correct. Adjust your cooking position, not the grill.
Cook three is the stability test. Pick the longest cook you realistically do, whether that is a pork butt or a couple of racks of ribs, and run it at a steady 300 to 350 with the lid down. Count how many times you had to adjust a knob. A grill that holds temperature without babysitting is a grill worth keeping. A grill that swings 75 degrees every time the wind shifts is a fire pit with a lid, and now you know before you plan a holiday around it.
The competition and why it lost
A two-burner tabletop is cheaper and easier to store, but two burners give you two zones at best and often only one, because the burners sit too close together. Zone cooking is the reason to own four burners, so a two-burner is a different tool for a different job.
A six-burner cart sounds like more grill for the money, and it usually is more grill than most people need. More burners mean more seams, more hot spots, and more propane burned to heat space you never use. Unless you are feeding a crowd every weekend, four is the sweet spot.
Pellet grills do not belong in this conversation. Different fuel, different airflow, different bench. If you want smoke as the primary flavor, go read a smoker guide instead, and I mean that sincerely.
Kamado cookers are charcoal, which is a religion, and I respect it enough not to lump it in with propane. Flat-top griddles are excellent and they are not grills. Natural gas is the luxury version of this whole setup, and if you have a gas line on the patio, check that the manufacturer approves a conversion before you buy anything, because converting an unapproved unit voids the warranty and creates a safety problem.
What this all costs
The two grills here sit in different tiers, so check the current Amazon price on each before you decide. Beyond the grill itself, budget for a propane tank if you do not have one, a cover, a stiff wire brush, a digital thermometer, and a loaf of cheap white bread. That is the entire kit.
The recurring cost is propane, and the only thing that changes it is how you cook. Zone cooking with the lid down burns less fuel than four burners wide open with the lid up, and a grill that recovers fast spends less time at full blast. The setup routine costs you one afternoon. The payoff is that every cook after it is predictable, and predictable is what separates a grill you use twice a season from one you use twice a week.
Do the bread map. Draw the grate. Write down the recovery time. Then cook something cheap and see if you were right.