Most new propane gas grill owners lose their first month to the same three problems. The grill runs a hundred degrees hotter on the left than the right. Nobody ever checked the gas connections with soapy water. And the grates still taste like machine oil on cook four. None of that is a defect. It is a setup problem, and it takes about two hours to fix.
I have run the same routine on every gas grill that has come through my patio in Austin: burn it off, map the heat, cook a dozen burgers, then a chicken, then a brisket if the grill earns it. This guide is that routine, in order, written for a brand new propane gas grill. It also covers the two grills I would put on a first-time buyer's short list and, more usefully, what to check on them before you trust one with a $40 piece of meat.
By the end you will know where your hot spot is, how long your grill takes to recover after you open the lid, and how to run two heat zones on three or four burners. That is the whole game. Everything else is accessories.
Why you should trust me
I spent 15 years on the line in Austin kitchens before I started judging on the BBQ circuit, which I have been doing for 12 years now. Judging teaches you to score what is on the plate, not what the team says in the turn-in box. Grills work the same way. The spec sheet is the team's story. The burger is the plate.
I own four grills and a thermometer collection my wife has opinions about. Every cook goes in a spiral notebook: ambient temperature, wind direction, where the food sat, and where the hot spots turned up. That notebook is why I can tell you that most uneven heat complaints are layout problems, not burner problems, and that a grill which cannot hold 350 for an hour without babysitting is a fire pit with a lid.
Three things I will not do. I will not review a pellet grill here, because that belongs on the smoker bench and I will send you there. I will not tell you a grill is great because a brand sent me one. And I will not pretend a BTU number on a box tells you anything about how a grill cooks.
What "dialed in" actually means
Four terms, and then the steps make sense.
Sear zone: the area that actually gets hot enough to crust a steak. On most gas grills it is smaller than the lid suggests, usually the back half of the left or right burner.
Hot spot: the corner of the grate that burns everything. Every grill has one. You find it on cook one, and then you either work around it or you return the grill.
Recovery time: how fast the temperature comes back after you open the lid. It is the most honest spec on any grill and it appears on no box.
Flare-up: what happens when a marketing team's "flare-free" grate meets dripping fat. It is a grease management problem, not a grate problem, and it is manageable.
Step one: match the burner layout to how you actually cook
Burner count is the decision that matters most, and it has nothing to do with prestige.
A three-burner grill with 37,000 BTU pushes more heat through each burner than a four-burner with 40,000 BTU. The four-burner spreads the same cooking area over gentler heat, which is easier to control and harder to sear on if you like a hard crust. The three-burner runs hotter per burner, which makes a smaller sear zone hit harder, and it leaves you fewer combinations for two-zone cooking.
Here is the practical version. Four burners give you more ways to set up an indirect side, which is what you want for chicken, ribs, and anything that needs 20 minutes or more. Three burners plus a side burner give you a hot sear zone, an indirect zone, and a place to run a sauce pot or a cast iron pan without stealing grate space.
Buy for the cooking you do on a Tuesday, not the brisket you imagine on a Saturday. Most people cook burgers, chicken, and vegetables. That is a two-zone job.
Step two: assemble it, then leak-check the whole gas path
Do this before the first cook, not after you smell gas.
Mix dish soap and water in a spray bottle. Turn the tank valve on with the burner knobs off. Spray every connection: the tank valve, the regulator, both ends of the hose, and the manifold where the hose meets the grill body. If you see bubbles growing, you have a leak. Tighten that joint with two wrenches, one to hold and one to turn, and test again. Never test with a flame. Never.
While you are under there, look at the hose for cracks or stiff spots, because a hose that sat in a warehouse for two seasons can dry out. Also check that the burner tubes are clear. Spiders nest in venturi tubes, and a partial blockage is the number one cause of a burner that lights with a lazy yellow flame on one side and a normal flame on the other.
If the igniter does not fire on the first or second click, stop and fix it now. An igniter that dies in week three is the most common complaint I hear, and it is usually a battery, a loose wire at the electrode, or an electrode gap that needs to be nudged closer to the burner.
Step three: burn off the factory oil, then oil the grates
New grates come coated in manufacturing oil. You do not want to eat it.
Light all burners, close the lid, and let it run on high for 15 to 20 minutes. That burns the oil off, and it will smell like a machine shop, which is normal. Let it cool enough to handle, then brush the grates with a stiff brush.
Enameled cast iron does not need the full bare-iron seasoning ritual, and you should not treat it like raw cast iron. What it does need is a thin coat of oil before food goes on. Fold a paper towel, pinch it with tongs, dip it in a high smoke point oil like canola or grapeseed, and wipe the grates while they are warm. That coat is what keeps the first burger from welding itself to the grate.
Step four: map the hot spots with bread
This is the cheapest test in grilling and almost nobody runs it.
Lay slices of plain white bread across the entire grate in a single layer. Close the lid, leave the burners on medium, and check at two minutes. The dark slices mark your hot spots, the pale slices mark your dead zones. You now have a heat map of your grill for the price of half a loaf.
If you want the version I actually use, it is a dozen cheap burgers. Same thickness, same fat ratio, spaced evenly across the grate. Flip them all at the same time and watch which ones finish first. That tells you more about a grill than any spec sheet, and you get lunch out of it.
Write down what you find: where the hot spot sits, how far the temperature drops when you open the lid, and how long it takes to come back.
Step five: learn your recovery time
Open the lid on a gas grill and the temperature falls. How fast it comes back is the difference between a grill you enjoy and a grill you fight.
Test it once, deliberately. Get the grill to 350 with the lid closed. Open the lid, leave it open for 60 seconds, close it, and time how long until the thermometer reads 350 again. Anything under three minutes is a grill that will cook a whole chicken without drama. Anything over five means you should plan longer cooks with the lid down and fewer peeks.
Wind matters more than people think. On a breezy Austin evening my numbers move 10 to 15 degrees, and a grill on an exposed patio corner will lose more heat than the same grill against a wall. Note the wind in your notebook and you will start to see the pattern.
Step six: build a two-zone setup and a flare-up plan
Two-zone cooking is the single skill that makes gas grilling worth it. Light the burners on one side, leave the other side off, and you have a sear zone and an oven in the same box.
On a three-burner grill, that means the left burner on and the right two off. On a four-burner, the two left on and the two right off. Sear over the lit side, then move the food to the dark side and close the lid. Chicken, ribs, thick pork chops, and anything with sugar in the marinade all belong on the dark side after the first few minutes.
For flare-ups, the plan is boring and it works. Keep the lid down so the fat does not get more oxygen. Trim fat before it goes on. Keep the drip tray and grease channels clean, because a full tray is a fire waiting for a reason. If you do get a real grease fire, turn the burners off, close the lid, and shut the tank valve. Do not throw water on it.
Step seven: a maintenance rhythm that keeps it honest
Ten minutes a month keeps a gas grill out of the graveyard.
Scrape the grates while they are hot. Empty the drip tray before it is full. Once a season, pull the burners and check the venturi tubes for spider webs and rust flakes, then brush the burner ports so the flame stays even. Check the igniter electrode gap. Cover the grill or roll it under a roof, because weather kills a grill faster than cooking ever will.
And keep a spare tank. Running out of propane at minute 40 of a brisket is a mistake you only make once.
The two grills I would start with
Both of these are propane, both sit in the entry-to-mid range, and both will handle every step above. I am giving you the spec, the layout, and what to check on arrival. I am not going to pretend a spec sheet is the same thing as a cook, so treat this as a shortlist and run the bread test yourself on day one.
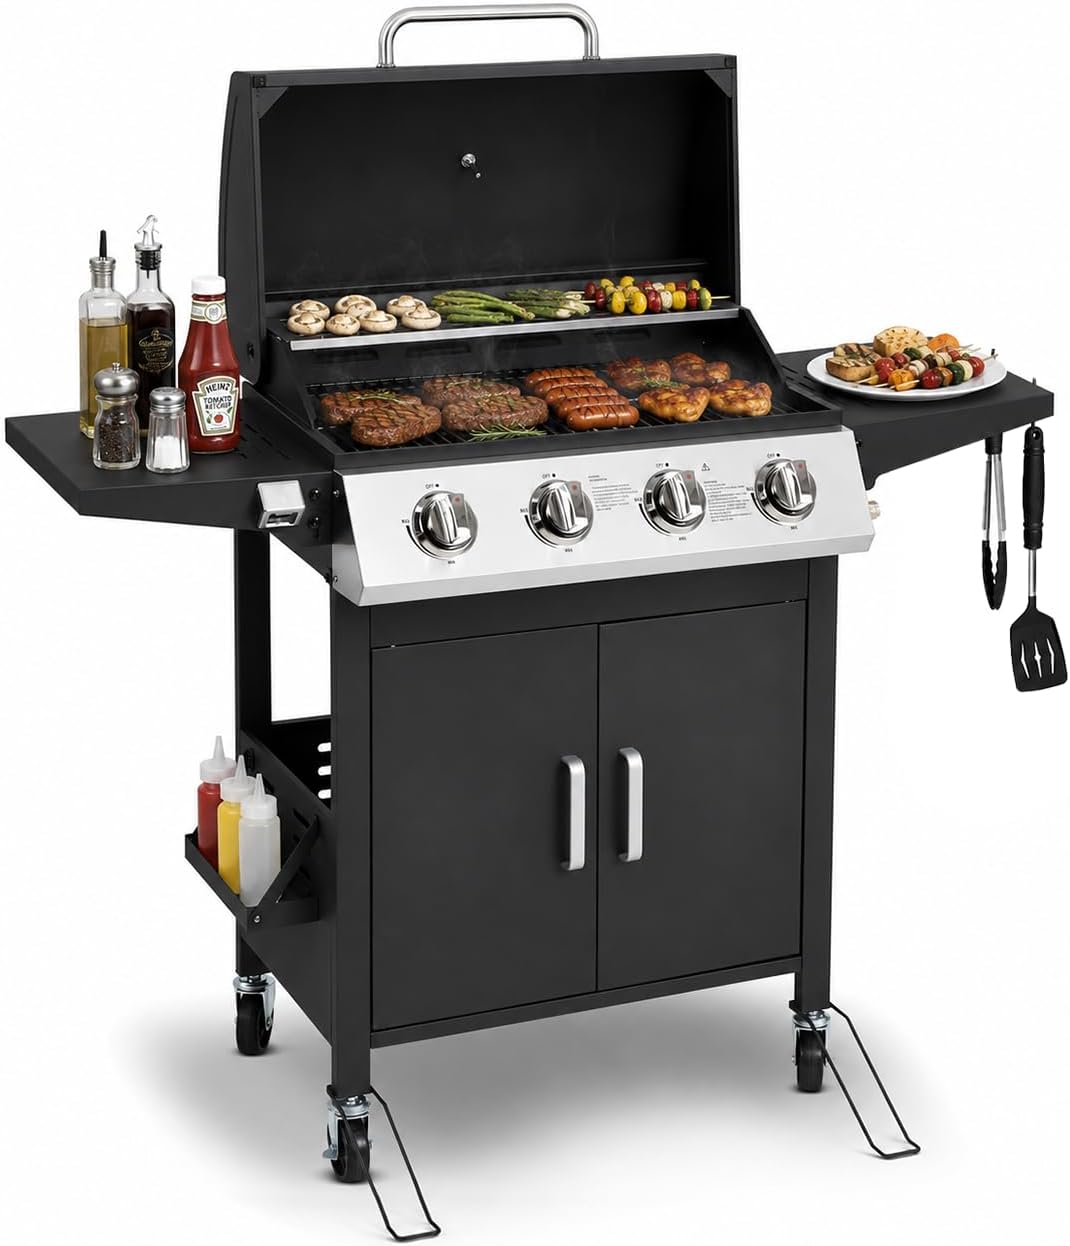
Budget pick: HUGROVE 4-Burner Propane Gas Grill for Outdoor Cooking 40000 BTU Black
 Visit on Amazon →
Four burners and 40,000 BTU total is the layout I would hand a first-time gas owner who wants to cook for a crowd. Four burners split into two zones cleanly, which means you can sear on the left two and finish on the right two without shuffling food around one hot strip. Per-burner heat is moderate at that total, so plan on a longer preheat than you expect, 12 to 15 minutes with the lid down, and give the grate time to soak up heat before the first burger goes on.
A black finish hides smoke stains better than stainless and shows grease splatter less. Check the igniter and the burner tubes on arrival, run the soapy water test on every joint, and buy a cover the same week you buy the grill. The drip tray is the part to keep clean on any four-burner, because a full tray is what turns a flare-up into a fire.
Anyone feeding a family or a tailgate crowd on a budget, and willing to preheat properly, will get along with this layout.
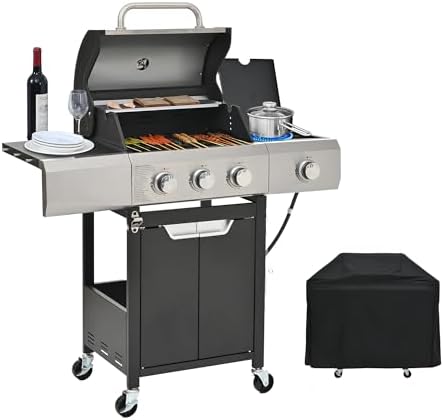
Upgrade pick: Endark 3-burner propane grill, 37,000 BTU with side-fire function
 Visit on Amazon →
The reason to pick this over the four-burner is the side-fire function. A side burner is the most underrated feature on a gas grill, and it is the difference between running back into the kitchen to finish a sauce and doing it two feet from the meat. It also gives you a place to run a cast iron skillet or a griddle without giving up grate space, which is how you get smash burgers and grilled onions out of the same cook.
Three burners at 37,000 BTU means each burner carries more heat than the four-burner above, so the sear zone hits harder and the two-zone setup is a little tighter. The enameled cast iron grate holds heat well and will leave good marks once it is oiled. Stainless steel on a grill in this range is usually a panel and lid finish rather than a full stainless body, so keep it covered and wipe it down, because stainless that sits in the weather will spot.
One warning about the lid thermometer on any grill: it reads the air under the hood, not the grate where your food sits. Use it for trends, then confirm with a leave-in probe at grate level. The wheels and the side burner make this an easy grill to move around a patio or roll into a garage for the winter, which matters more than the spec sheet suggests.
Anyone who wants a hot sear zone plus a burner for sauce, sides, or a griddle, and who does not need four burners of grate space, should look here first.
What I left off this list, and why
No pellet grills. Pellet cooking is a different discipline on a different bench, and if you want smoke flavor I will point you at a smoker every time.
No charcoal. Charcoal is a religion and I respect it, but this is a how-to for people who want to press a knob and cook on a Tuesday. If you want the ritual, buy a kettle and read a different guide.
No natural gas conversion. Natural gas is a luxury, and converting a propane grill means a plumber, a permit in some places, and a different orifice set. Worth it if you are staying in the house for a decade. Wrong as a first step.
No side griddles as a separate recommendation. A griddle accessory is the best money you can spend on a gas grill after a cover, but it belongs on the accessory list, not on a shortlist of grills.
What this all costs
The grill is the smallest part of the math over five years.
You need a tank and a spare, a cover, a stiff brush, and a good leave-in thermometer, and those four things together will outlast two grills. Propane is a utility bill, not a purchase. How many cooks you get from a tank depends on burner count, wind, and how long you preheat with the lid up, so a four-burner in a windy spot will drink more gas than a three-burner against a wall. Buy the spare tank and stop thinking about it.
The rest of the cost is time. Twenty minutes to leak-check and burn off the oil. Half a loaf of bread to map the heat. One deliberate recovery test. Do those three things once and the grill stops being a mystery box on the patio. Skip them and you will spend the first season blaming the grill for a hot spot that was in the layout the whole time.
That is the job. A propane gas grill is a tool, and like any tool it works a lot better after you learn where it is sharp.