Most people run a gas grill like a stovetop with one setting: all burners on high, food somewhere in the middle, hope for the best. Then the burgers come off black outside and pink inside, or the chicken skin burns before the thigh hits 165.
Gas grill heat zones fix that. Two zones, one hot and one cool, is the biggest upgrade you can make to any gas grill, and it costs nothing but attention. You do not need a new grill to do it. You need to know where your heat actually is.
I have been cooking on live fire for the better part of three decades, 15 of those years on restaurant lines and 12 more judging barbecue competitions across Texas. Here is the setup I run and the two grills I would point a beginner at.
Why you should trust me
Fifteen years on the line taught me that heat control is the whole job. Twelve years judging taught me that most people blame the meat for what is really a temperature problem. I own four grills and a thermometer collection my wife has opinions about, and every grill I test gets the same routine: a dozen burgers to check evenness across the grate, a full brisket for heat stability, and a chicken for flare-ups. I keep a spiral notebook with ambient temp, wind, and where the hot spots showed up.
That routine is why I do not care about BTU badges. A grill that cannot hold 350 for an hour without babysitting is a fire pit with a lid. Burner layout and grate material tell you more in ten seconds than a spec sheet tells you in ten minutes.
What two-zone cooking actually means
Two-zone cooking is simple: one part of the grate runs hot for searing and crust, another part runs cool for finishing and anything delicate.
On a three-burner grill, the knobs do the work. Left burner high, middle medium, right off. The left is your sear zone, the middle is your workhorse, and the right, with the lid down, is a 300 to 350 degree oven.
On a single-burner portable, you build zones with distance. The center of the grate is hottest, the outer edges run cooler, and you move food inward or outward the way you would with a charcoal pile.
The reason this matters is carryover. A steak pulled at 125 and left sitting on a hot grate will climb to 140 while you set the table. A steak moved to the cool side with the lid down climbs on your schedule instead of the grill's.
Two terms worth knowing before you start. A hot spot is the corner of the grate that burns everything, and every grill has at least one. Recovery time is how fast the temperature comes back after you open the lid, and it is the most honest spec a grill has.
The two grills I would set up for this method
You can run two zones on almost anything with a lid and a burner. These are the two layouts I would start with: one full-size cart grill for a patio, one portable for a balcony or a tailgate.
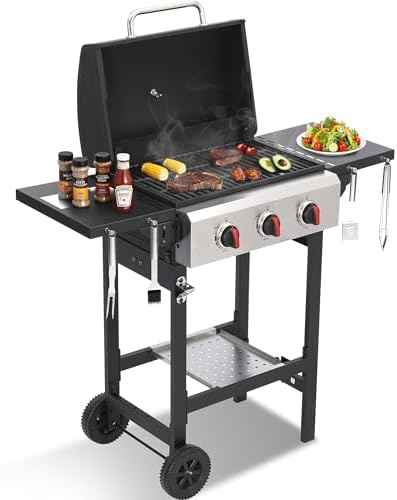
Main rig: 3-Burner Propane Gas Grill with Cast Iron Grates, 38200 BTU output,Foldable Side Shelves for Portable Outdoor Patio Camping, Black (3 Burner)
 Visit on Amazon →
Three burners in a row is the layout that makes this method easy, because each knob becomes a zone. Cast iron grates are the right call for searing: they hold heat, they do not warp, and they leave real marks on a steak. The tradeoff is maintenance. Cast iron rusts if you leave it wet, so it wants a scrape, a wipe of oil, and a closed lid over warm grates after every cook.
The foldable side shelves matter more than the marketing suggests. You need landing space for a sheet pan, a plate, and a pair of tongs, and on a small patio you also need all of that to fold away when you are done. The 38,200 BTU figure across three burners is moderate output, which is honest for a cart this size. BTU per square inch of grate is what actually cooks the food.
Check current Amazon price before you commit, since listings on cart grills move around.
Flaws but not dealbreakers: The black body shows grease fast, and there is no side burner for a sauce pot. Cast iron wants a seasoning habit, not a scrub brush.
Anyone with a patio and four to eight people to feed will get the most out of this layout.
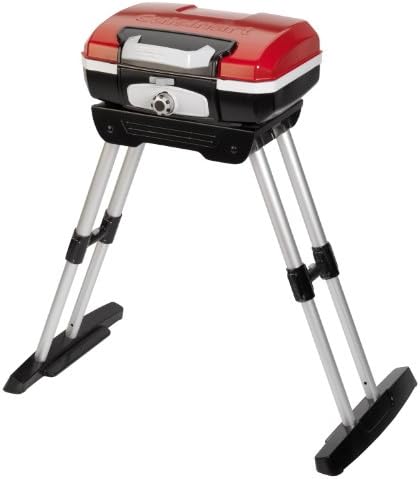
Compact option: Cuisinart Gas Grill w/VersaStand, Petite Gourmet, Portable, 5,500 BTU
 Visit on Amazon →
The VersaStand is the reason to look at this one. It locks the grill at tabletop height when you are cooking off a tailgate or a picnic table, then unfolds into legs so it stands on its own on a balcony. That is a real problem solved, not a gimmick.
At 5,500 BTU this is a small single-burner grill, and that is the point. It heats in a few minutes, sips propane, and gives you a hot center and cooler edges for two-zone work by distance. You will not hold 350 for an hour with the lid down the way a cart grill will, and you should not expect it to. What you get is a sear on a couple of steaks, a small batch of burgers, or a two-person dinner without firing up a full cart.
Check current Amazon price, since portable grills are the category that discounts most often.
Flaws but not dealbreakers: One burner means no independent zone control, and the grate area is small enough that a crowd is out of the question. Wind is the enemy on a balcony, so plan a screen.
Anyone in an apartment, a camper, or a tailgate setup will be happy with it. Anyone cooking for six will not.
The setup, step by step
Step one: Check the gas path before you light anything. Tank valve, hose, regulator, connections. Brush soapy water on every joint and watch for bubbles. A leak you find with soap is a leak you do not find with your eyebrows. If a burner fails to light, turn everything off, open the lid, and wait five minutes before trying again. Gas pools under a closed lid.
Step two: Preheat with the lid down. Ten to fifteen minutes, all burners on high, lid closed. Preheating with the lid open wastes propane and patience. If it is windy, add five minutes.
Step three: Map your hot spots. This takes five minutes once a season and it changes how you cook. Lay four or five flour tortillas across the grate, close the lid for 60 to 90 seconds, and read the scorch pattern. The darkest marks are your hot spots. On most cart grills the ends run cooler because heat escapes at the open sides, and the front edge near the knobs runs hotter than the back.
Step four: Scrape, then oil. Scrape the grates with a brush while they are hot, then fold a paper towel, soak it in a high smoke point oil, hold it with tongs, and wipe the grates down. Twenty seconds, and it is the step that keeps food from sticking.
Step five: Set the zones. On three burners: left high for searing, middle medium, right off. Put a drip pan under the cool side to catch fat, and add a little water to the pan if you want moisture in the chamber. On a single burner: leave it on medium and plan to move food to the outer edges.
Step six: Know your target temperatures. 450 to 500 for a sear on steak. 350 to 400 for burgers, chicken pieces, and sausage. 300 to 325 indirect, lid down, for thick cuts and bone-in chicken. These are grate temperatures, not hood temperatures, and hood thermometers are usually reading 25 to 50 degrees off in one direction or the other.
Step seven: Cook in two moves. Sear over the hot zone until you have the crust you want, then slide the food to the cool side, close the lid, and let it finish. That is the whole method. It is how you get a burger that is brown through the middle instead of grey, and how a thick pork chop reaches 145 without a burnt exterior.
Step eight: Manage the lid like it costs money. Every time you open it, you dump heat and the grill has to recover. On a good cart grill, recovery takes a minute or two. On a small portable it takes longer, so open the lid less. If you are looking, you are not cooking.
Step nine: Handle flare-ups before they handle you. Trim fat to about a quarter inch before the meat hits the grate. If a flare starts, move the food off the flame, turn down the burner under it, and let the fat burn off with the lid open. Keep a squirt bottle handy for grease, but do not soak the burner tubes.
Step ten: Shut down in the right order. Close the tank valve first, let the burners burn off the gas left in the line, then turn the knobs off. After you eat, run the burners on high for ten minutes with the lid down to burn off residue, then brush and oil the grates while they are still warm.
Where most people go wrong
Trusting the hood thermometer is the first mistake. It measures air at the top of the lid, not the surface your food sits on. Use a grate clip or an instant-read probe and learn what your grill actually does.
Preheating with the lid open is the second. All you are doing is heating the sky.
The third is skipping the cool zone, then wondering why the outside of the chicken is done before the inside. The fourth is overloading the grate. Crowding drops the temperature, and now you are cooking in a puddle of steam.
The fifth is treating the igniter as an afterthought. If you have to light the grill with a long match by week three, that is a design failure, not user error. Keep the electrode clean and the battery fresh.
The sixth is cleaning the grates and never the burner tubes. Grease and spiders get inside, and you end up with uneven flames and cold spots that look like a mystery.
Maintenance that keeps a cheap grill alive
Once a season, pull the burner tubes and check the ports for blockages. A wire brush and a paper clip handle most of it. Check the orifice where gas enters the burner, and check for spider webs, which are a genuine fire hazard in a warm climate.
Cast iron grates get scraped, oiled, and left alone. No soap, no soaking. If they rust, scrub the rust off, oil them, and heat them until the oil smokes.
Cover the grill once it cools, and check the hose and connections for cracking twice a season. Store propane tanks upright, never in a hot trunk, never indoors.
When a gas grill is not the right answer
If smoke flavor is the point of the cook, a gas grill is a convenience appliance and it will not get you there. Charcoal is a different relationship with fire, and a pellet cooker is a different machine entirely, one that belongs on the smoker bench, not here.
Gas is a utility. It is fast, it is repeatable, and with two zones it is genuinely good at weeknight cooking. If that is the cooking style you actually have, this is the right tool. Buy for that, not for the version of yourself who hosts a whole hog every August.
What this costs you in time
The money question is easy: both grills above link to their current listings, so check current Amazon price when you are ready. The time question is the one that decides whether you will actually use the thing.
Preheat, ten to fifteen minutes. Hot spot mapping, five minutes once a season. A sear, two to four minutes a side. An indirect finish, ten to twenty-five minutes depending on thickness. A burn-off and brush, ten minutes. Call it 45 minutes for a real dinner, most of it hands off.
That is the trade. You give the grill 15 minutes of preheat and it gives you a hot side and a cool side for the rest of the cook. Set the zones before the food goes on, keep the lid down, and let the layout do the work.
Your grill was built to hold two temperatures at once. Use both.