Most people blame the grill. They buy a propane grill, crank every burner to high, slap a chicken thigh on the grate, and when the skin sticks and the fat catches they decide gas grilling is a compromise. It is not. Learning how to grill on propane comes down to controlling three things: preheat, burner layout, and where the fat goes when it renders. Get those right and a modest grill cooks better than an expensive one run badly.
I have cooked on a line, judged barbecue on a circuit, and spent years testing grills in an Austin backyard that swings from 100-degree afternoons to sudden north winds in the same cook. My spiral notebook has every one of those cooks logged with ambient temperature, wind direction, and the corner of the grate that ran hot. The pattern never changes. The grill is rarely the problem. The method usually is.
What follows is that method, start to finish, plus the two grills I would hand a beginner depending on whether the cooking happens in a backyard or a parking lot.
Why you should trust me
I spent 15 years as a line cook before 12 years running a barbecue judging circuit, and both jobs taught the same lesson from opposite directions. A line cook learns that heat is a tool you aim. A judge learns that most cooks never aim it. I own four grills, a thermometer collection my wife considers a medical condition, and a notebook I actually fill in.
My current project is flare-up control. I am working through 2026 models from four brands that all claim flare-free grates, and so far one out of four is telling the truth. The rest moved the flames somewhere I could not see them and called it engineering.
Two boundaries you should know about. No pellet grill content lives here, because that is a smoker's job and I send people to the smoker bench for it. And no paid placement, ever. When a brand sends a unit, I say so in the write-up.
How I picked and how I tested
The routine I run on any grill is boring on purpose. A dozen same-size burgers for evenness, rotated once, watching which one browns first. A full brisket for heat stability, because a grill that cannot hold a steady temperature for six hours is a fire pit with a lid. And a skin-on chicken for flare-ups, lid closed, counting the flames. That is the whole test. No spec sheet survives it.
For this guide I looked for four things. Enough burner control to run two heat zones, not just one. A lid that seals well enough to trap heat. A grease path that carries rendered fat away from the fire instead of onto it. And an igniter that still works in season three, because an igniter that dies in week three is the fastest way for a grill to end up on the curb.
A note on the numbers that get printed on the box. BTU ratings are marketing. Even heat distribution is engineering. The honest spec nobody prints is recovery time, which is how fast the temperature climbs back after you open the lid. Time that yourself once and you will know more about your grill than any brochure can tell you.
The gear the method is built around
Everything below is about cooking technique, but technique needs a surface with controllable burners. These are the two I would point you at, one for the yard and one for the road.
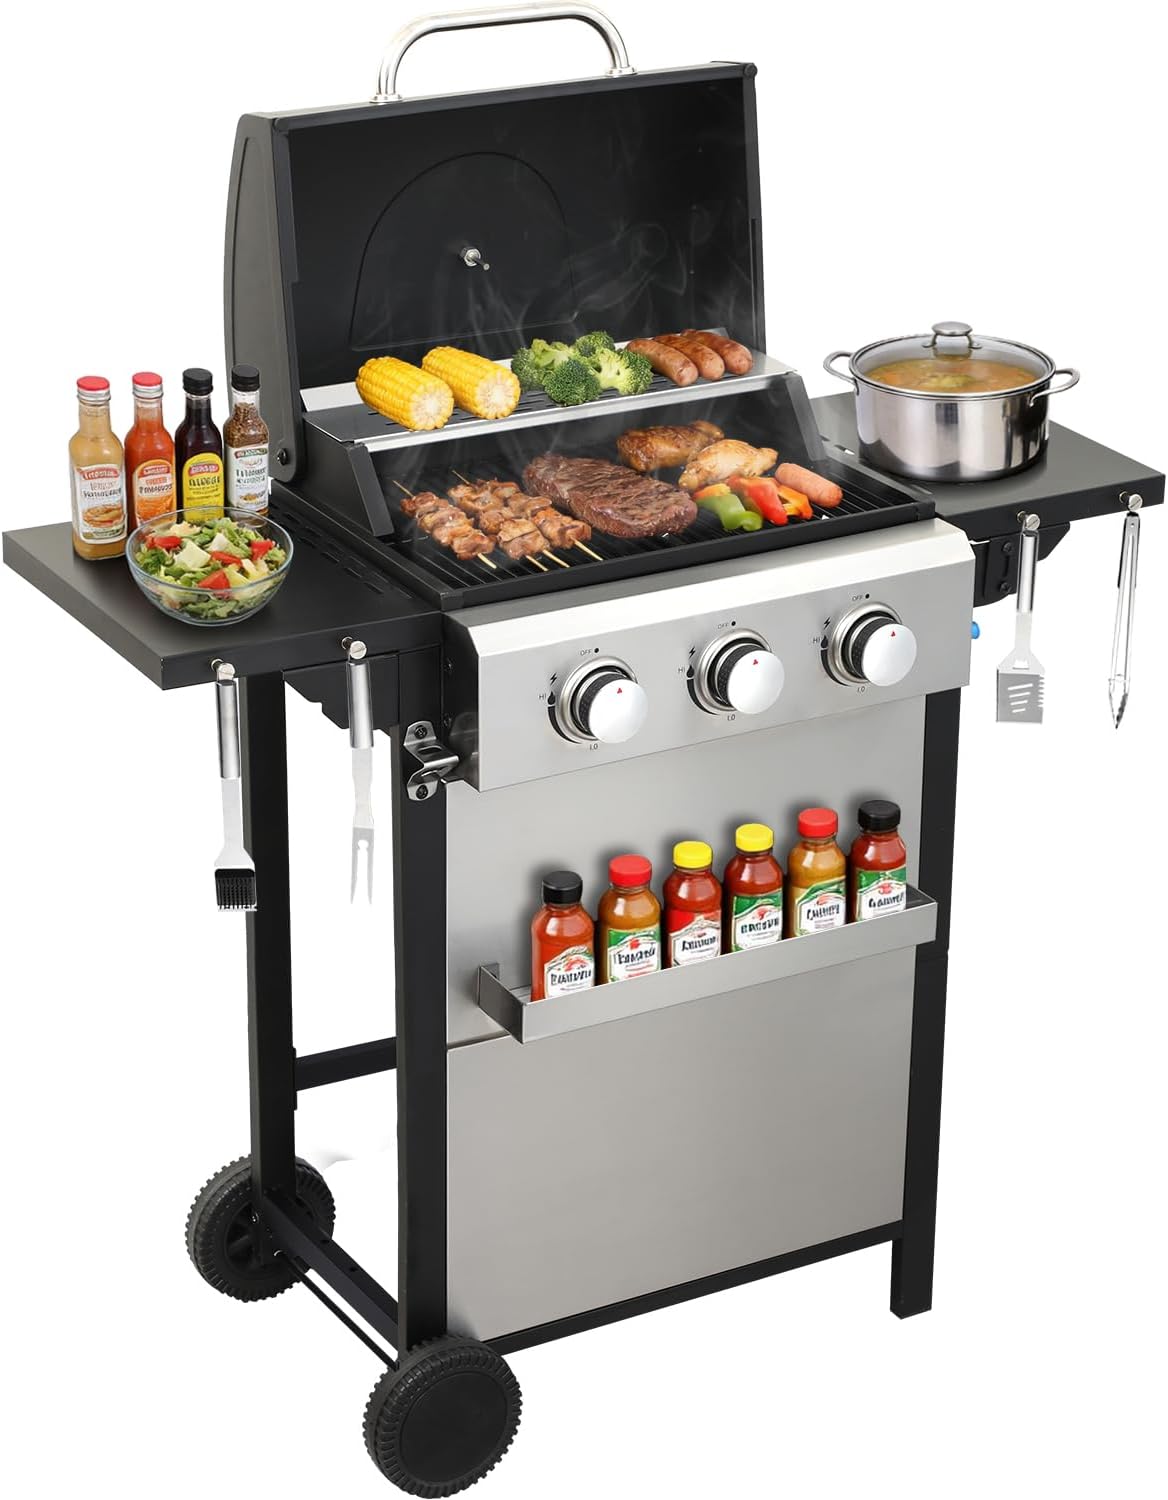
The backyard three-burner: 3 Burner Propane Gas Grill, 30,000 BTU Stainless Steel Outdoor BBQ Grill with 322 Sq. In. Cooking Area & 2 Foldable Side Shelves, Patio Cookout Essentials for Backyard
 Visit on Amazon →
Three burners is the number that matters here, more than any total BTU figure. Divide 30,000 BTU across three burners and you are at roughly 10,000 per burner, which is a sane, controllable flame rather than a blowtorch. That is exactly what a two-zone setup needs: one burner wide open for the sear, one burner low for holding, and one burner off as the place you move food when the fat starts dripping. A single-burner grill cannot do this. A three-burner can do it on a weeknight.
The 322 square inch cooking area is honest family-of-four territory. That is a dozen burgers, two spatchcocked chickens, or a rack of ribs cut in half with room to rotate. It is not a party grill, and I would rather tell you that now than have you discover it in front of 20 guests.
The stainless steel body and the two foldable side shelves matter more than they sound. Side tables smaller than a plate are a personal grievance of mine, and shelves you can fold down are the difference between a grill that lives on a small patio and one that lives in the way. Fold them in and the footprint shrinks to something a balcony can take.
Flaws but not dealbreakers: The per-burner heat is moderate, so this is not a steakhouse sear machine out of the box. Give it a full preheat and it will crust a ribeye fine. And if you regularly cook for a crowd, you need more grate area, not more BTU.
Anyone with a patio, a family, and a weeknight dinner problem will get the most out of this one.
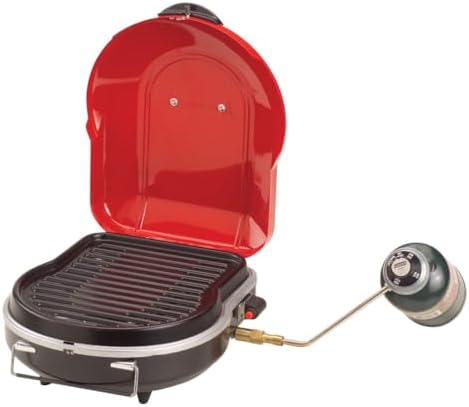
The portable pick: Coleman Fold ‘N Go 6,000 BTU Portable Propane Grill, Lightweight Gas Grill with Push-Button Starter & Adjustable Horseshoe Burner, Great for Camping, Tailgating, Grilling, BBQ
 Visit on Amazon →
6,000 BTU sounds weak until you remember what this grill is for. It runs off a small propane canister, it is built to be carried, and it is designed for a campsite table or the back of a truck, not for a six-hour brisket. Within that job it does something genuinely useful: the adjustable horseshoe burner gives you a dialable ring of flame with a cooler center, which is a crude version of the two-zone setup you get from three straight burners. Hotter around the ring, gentler in the middle.
The push-button starter is the feature I care about most on a portable. At a tailgate, with wind and cold hands, the last thing you want is to be the person hunting for a lighter while everyone waits. The lightweight build and the fold-down design are the other half of the point: this is a grill that lives in a tote until it is needed.
Flaws but not dealbreakers: Wind beats this grill faster than it beats anything in a backyard, so bring a shield or park it out of the breeze. The grate is small, which means cooking in batches instead of all at once. And 6,000 BTU will not put a hard sear on a thick steak. Cook thinner cuts, sausages, and vegetables and it is a pleasure.
Anyone who camps, tailgates, or wants a grill that fits in a car trunk should start here.
Step one: preheat like you mean it
Direct answer: 10 to 15 minutes, lid down, every burner on high, then dial back to your cooking setting. Not five minutes, and never with the lid up.
Here is why it matters. Cold steel bonds to protein. Put a chicken thigh on a grate that has only seen five minutes of heat and the skin welds itself to the metal, and when you flip it you leave the skin behind. Get the grate properly hot and the food releases when it is ready, which is the closest thing grilling has to a timer.
You can check the grate with the old hand test: hold your palm about three inches above the grate and count. Four or five seconds and it is ready to cook. Two seconds and you are in sear territory. If you can hold your hand there for eight seconds, close the lid and wait.
Step two: map your heat zones before the food goes on
Every grill has hot spots. On a three-burner they tend to sit in the back corners near the hinge and directly above the crossover tube that links the burners. On a small portable they follow the horseshoe ring. You cannot fix a hot spot, but you can plan around it.
The easiest way to find yours is a loaf of cheap sliced bread. Lay slices across the entire grate, close the lid for 60 seconds, then flip them and look. The darkest slices mark your hot zones. That toast map is worth more than the thermometer on your lid, which measures air under the hood, not the surface you are cooking on.
Once you know the map, cook by zones. On the three-burner: left burner high for the sear, middle burner off, right burner low for finishing. Sear on the left, move to the right to bring the interior up to temperature, and keep the middle empty as the place food goes when something goes wrong. On the portable, work the ring for the sear and the cool center for the rest.
Step three: flare-ups are a fat problem, not a grate problem
A flare-up is what happens when rendered fat hits something hot enough to burn it. That is the whole mechanism. It means the fix is about the fat, not the flame.
Three things work. Move the food off the fire and onto the burner that is off. Close the lid for about 30 seconds, which starves the flame of oxygen and lets the fat burn off without you feeding it. And keep the grease path clear, because a tray packed with last month's drippings has nowhere to send new fat.
Two things do not work. Squirt bottles aimed at the grate turn into steam and ash, and they can splash grease sideways. And standing there with the lid open fanning the flames is the single best way to make it worse, because you are feeding it air.
Prevention beats all of it. Trim fat to about a quarter inch, do not press your burgers with a spatula, and give fatty cuts a home on the low side of the grill rather than directly over a wide-open burner.
Step four: respect recovery time
Recovery time is the most honest spec on any grill and the one nobody prints. Every time you lift the lid, you dump the heat you spent 15 minutes building. A grill that comes back in two minutes lets you cook. A grill that takes eight minutes means you are babysitting, and a grill that cannot hold 350 for an hour without babysitting is a fire pit with a lid.
Time yours once. Note the lid reading, open the lid for 15 seconds like you would to flip a steak, close it, and time how long until the needle returns. Write it in a notebook if you want to get serious about it. That number tells you how to cook.
Then cook accordingly. Batch your work: one lid opening to flip everything, not four separate trips. Keep the lid down between moves. If your grill recovers slowly, lean on the low zone more and use the sear zone for shorter bursts.
Step five: shutdown and the maintenance that prevents most problems
After the cook, leave the burners on high with the lid closed for 10 minutes and let the grate burn clean, then brush it while it is still hot. A cold, greasy grate is the reason people think they need a new grill.
Empty the grease tray every few cooks, not every season. Check the burner tubes in spring for spider webs and rust, since both block gas flow and both cause uneven heat that people blame on the grill. Test the igniter before your first cook of the year rather than during it. On the portable, disconnect the canister after every use, check the O-ring, and carry a spare canister so a good cook does not end because a small tank ran dry.
Cover the grill if it lives outside. A $30 cover does more for burner life than any feature on the spec sheet.
What this costs to run
The grills are a one-time cost, and you can see current pricing on each listing above rather than take my word for it. The recurring cost is propane, and it is the cheapest variable in this entire equation: a refilled tank spread across a season of weeknight dinners is a rounding error compared to what the same meals cost from a restaurant.
The other recurring cost is maintenance, and it is mostly time. Burn it off, brush it, empty the tray, cover it. That is the whole program, and it is the reason a well-kept inexpensive grill outlasts a neglected expensive one.
What I left out and why
If you are shopping for a four-burner cart with a side burner and a rotisserie kit, this is not that guide. That is a bigger footprint, a bigger budget, and a different conversation about whether you actually cook for that many people. Buy for the cooking style you have, not the one you imagine in a showroom.
Pellet grills and charcoal are also absent on purpose. Pellet is a smoker's tool and it belongs on the smoker bench. Charcoal is a religion, and I respect it, but it is a different method with a different set of skills. Today is about propane, which is a utility, and utilities reward good habits.
The bottom line
How to grill on propane is not a secret. Preheat for a full 10 to 15 minutes with the lid down. Find your hot spots with a loaf of bread and cook in zones. Treat flare-ups as a fat problem and solve them by moving the food and closing the lid. Time your recovery once so you know how your grill actually behaves. Burn it off and cover it when you are done.
Do those five things and the grill stops being a compromise. The backyard three-burner gives you the zones to run this method properly, and the portable Coleman lets you run a simplified version of it anywhere you can set a table. Pick the one that matches where you cook, learn its hot spots, and get on with dinner.